Sea glass is a beloved treasure collected by beachcombers around the world. The frosted, smooth edges are the result of glass tumbling in the ocean for years. But it is possible to recreate this effect at home without an expensive tumbler. There are several methods for making your own magical sea glass creations.
The basic process involves breaking glass into small pieces and then tumbling it with an abrasive like sand and water. This mimics the effect of ocean waves wearing down the sharp edges of glass. Methods for DIY sea glass making include using a cement mixer, mason jar, or rock tumbler barrel. You can also try securing glass pieces in a mesh bag and placing it in a running current. With some creativity and patience, beautiful frosted sea glass can be achieved.
Creating sea glass without a tumbler does take time and effort. But the ability to make your own unique pieces is rewarding. Experiment with different glass colors and shapes. Craft dazzling jewelry or art from your homemade sea glass treasures. With a few simple supplies and techniques, you can unlock the secrets of crafting sea glass at home. Discover the joy of this hands-on process and unleash your inner beachcomber. Let’s explore how to transform ordinary glass into frosted ocean gems.
Tools and Materials
- Play or beach sand
- Water
- A cement mixer
Make sure you wear protective gloves and goggles to avoid injury when handling the glass mixture! Remember, it can be sharp even though it is smooth. Don’t cut yourself during this process! When making sea glass without a tumbler, remember that you can use any type of sand and water. If you do not like the result, try again with different ingredients or proportions!
How to Make
Follow these simple steps to make sea glass without a tumbler:
- Put on your gloves and goggles first! This is important to avoid injury. Make sure the sand you choose has no sharp pieces in it; otherwise, you will cut yourself at some point during this process.
- Pour half of the water into your cement mixer (or large bucket, if you are using one).
- Add the sand slowly to your mixture.
- Add glass pieces to the cement mixer carefully.
- Turn the machine on and wait for 4 hours.
- Check the results. If you are not satisfied – let the cement mixer continue its work.
Finally – you can use this wonderful sea glass in your art projects! Be creative with how you choose to utilize this material.
How to Break and Prepare Glass for Tumbling
Before we start the tumbling process, we first need to prepare our pieces of glass. When breaking glass to create your own sea glass, safety is paramount. Always use gloves and eye protection when dealing with shards of glass.
- Choose your source glass. This could be colored glass from bottles or vases, or even clear glass. You could recycle glass from old wine bottles or find interesting colored or stained glass at garage sales. Remember, thicker glass can give you large pieces of sea glass, while thinner glass might be more suitable for smaller pieces.
- To break the glass, wrap your piece in a thick cloth and gently hammer it. Make sure you’re doing this in a safe, contained area where you can easily clean up afterward.
- Once you have enough glass, sort through it carefully. Select pieces that are thick enough to make it through the tumbling process, and remove any shards that are too thin or small.
The Process of Making Sea Glass Using a Rock Tumbler
After you have your batch of glass, it’s time to get down to the nitty-gritty of the process – the tumbling.
- Fill the tumbler barrel about halfway with your glass pieces. The amount of glass you can find will dictate the size of your batch.
- To this, add coarse silicon carbide grit. This is the abrasive material that will smooth and frost the surface of the glass, creating that classic sea glass appearance.
- Finally, add enough water to just barely cover the glass and grit in the barrel of the rock tumbler.
- Secure the lid on the barrel and place it on the tumbler. If you’re using a rock tumbler, let the tumbler run for about a week. Check the progress every few days to ensure everything is going smoothly.
- Once the tumbling process is complete, you’ll have to clean the tumbler thoroughly. Be careful not to rinse it with water directly into your sink, as the residual grit and sand will clog your pipes.
Making Sea Glass without a Rock Tumbler
If you do not own a tumbler, you can still make sea glass at home. A popular alternative is using a cement mixer, though you can also make sea glass by shaking a mason jar filled with sand, water, and your glass pieces. However, these methods may not give you as polished a result as using a rock tumbler or take much longer.
Breaking Down the Process of Tumbling Glass: A Comprehensive Guide
To make the process of creating sea glass without a tumbler more accessible and easy to understand, it is vital to break it down into smaller steps. This approach also makes it easier to teach, especially if you’re teaching it to a group or class of budding lapidary enthusiasts. In this section, we will elaborate on the steps mentioned in the original article, providing you with a comprehensive and easy-to-understand guide on making sea glass.
The Journey of Transforming Scrap Glass into Beautiful Sea Glass
In essence, making sea glass can be seen as an exciting journey that transforms ordinary scrap glass into beautiful pieces of art that mimic natural sea glass. The key to this transformation lies in the process we often refer to as ‘tumbling’. But how do we go about this without a tumbler? This is where things get interesting.
Selection of Glass: What Types of Glass to Use
One of the first steps in our beach glass tutorial is the selection of glass. The types of glass you can use can range from vintage glass pieces, glass from old wine bottles, or even scrap glass you have lying around. The beauty of this is that any glass can be transformed into sea glass. So, whether it’s colored glass from bottles or vases, or even clear glass, your chosen glass pieces will make beautiful sea glass pieces once the process is complete. Remember, thicker glass can provide larger pieces of sea glass, while thinner glass might be more suitable for smaller pieces.
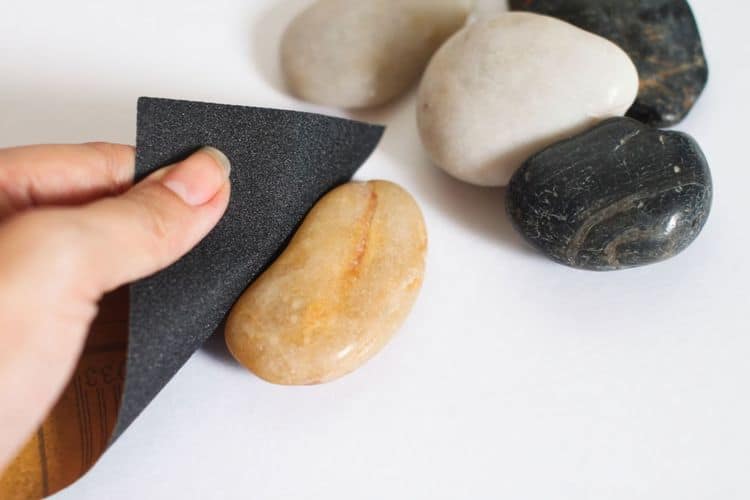
Preparing the Glass: Cutting and Shaping
The next step is preparing the glass for tumbling. This process involves cutting and shaping the glass into smaller pieces of glass. It’s important to remember that safety is paramount when dealing with shards of glass. Always use gloves and eye protection when cutting glass. To break the glass, you can wrap your piece in a thick cloth and gently hammer it.
Tumbling the Glass: Motion of the Ocean Simulation
The concept of making sea glass with a rock or even a cement mixer is to simulate the motion of the ocean. The natural sea glass is made by the ocean’s constant tumbling of glass over many years. To mimic this process, we use a cement mixer or any rotating device. The glass is placed in the mixer with sand and water and left to tumble for several hours.
The process of tumbling glass in a rock tumbler or cement mixer is similar to how the ocean wears down rocks and glass. The frosted glass look of sea glass is achieved by the rough sand scratching the surface of the glass, creating a frosted appearance.
For those using a cement mixer, you would fill the mixer about a third of the way full with your prepared glass, sand, and water, and then let the mixer run for as long as you would if you were using a tumbler, generally around 4 hours.
Transferring Your Homemade Sea Glass into Art
Once you have your beautiful sea glass, the world is your oyster! Many people enjoy using sea glass in their home decor or making jewelry with it. Your homemade sea glass could become a centerpiece in a decorative glass vase, or be used in a DIY sea glass art project. Or, you could use sea glass spray paint to add a frosted, tinted look to clear glass.
Regardless of how you decide to use your sea glass, remember: it’s the journey, not the destination. The process of collecting glass, preparing it, and watching it transform is a rewarding and enjoyable experience in and of itself.
In conclusion, while the tumbling process is time-consuming, the end result is worth it. With some patience, you can create your own sea glass using a rock tumbler or even by hand. Happy tumbling!
FAQs
Can I make sea glass without a tumbler if I don't have sand?
Yes, you can! Instead of using the traditional method with sand and water, try experimenting with different materials. For example, instead of your standard beach or play sand - you could use crushed shells or even rice! As long as it is ground up into small pieces, it should work just fine!
How long does it take to make sea glass without a tumbler?
It depends on the machine you are using. However, most of them need about four hours to mix everything perfectly together. When making sea glass without a tumbler, remember that patience is key! You will have your final results in due time!
Final Thoughts
Making sea glass is a way to have beautiful, sparkly jewelry without paying an arm and leg for it. The best part? You can make it yourself with two simple ingredients that most people already have at home- sand and water. This tutorial will show you how!
If you like sea glass think about buying a rock tumbler. Even the cheapest one will help you save time and effort.

If i don’t have a tumbler why the hell would i own a cement mixer. That the only flaw I have with this article thank you for your time.
Hi, Emma.
Thanks for your comment. The main idea was that you can use anything rotating.